The microphone is one of the most expensive elements of your home studio. A professional microphone can cost several thousand euros, if not more. It depends a lot on what you want to record.
Most of the time producers need to record voices and/or acoustic musical instruments. Here I will help you to choose the type of microphone you need depending on the source you want to record.
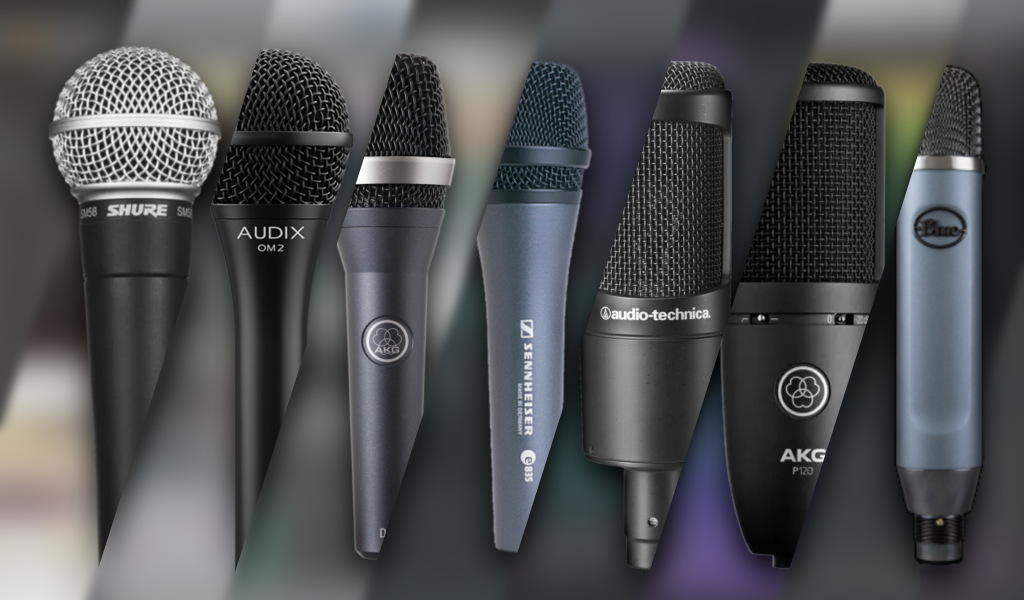
This will be fairly straightforward as we will only be looking at two types of microphones in particular: dynamic microphones and large-diaphragm condenser microphones.
Dynamic microphone
Dynamic microphones are the ones most often seen in concert or on TV on a stand or held by the performer. Moreover, there are different types of dynamic microphones but those with a handle that you can hold in your hand are also called vocal microphones. These mics are quite affordable for the entry-level models (less than 50€). They don’t need a power supply and are quite robust as they are made to be handled. Some can have an internal suspension system to avoid handling noises. However, you should not drop them or you will damage them.
Their operation is quite simple. The sound from the source vibrates a thin plastic membrane resembling a mini-speaker (called the capsule), and the vibrations produce an electrical signal that can be reproduced and/or recorded. Above this capsule, there is a protective grid, often made of metal, lined with foam to prevent the air coming out of the mouth from hitting the membrane, as this would prevent the sound of the voice from being properly captured by the microphone.
They can be used for voice and instruments, even very loud ones, because its construction makes it resistant enough to high sound volumes. On the other hand, these microphones are not very sensitive and must be close to the sound source. This is one of the reasons why singers practically stick their lips against the microphone so that their voice, at a normal level, is well captured. Beyond the voice, they can be used to pick up the sound of a guitar amp at high volume. Dynamic mics also tend to lack high frequency accuracy. This makes them unattractive for recording instruments with a lot of high frequencies such as drums or acoustic guitar.
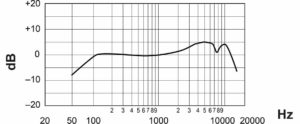
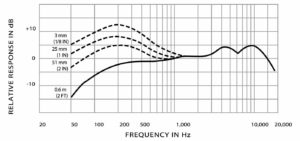
Also, dynamic microphones have a frequency response curve that changes with distance from the sound source. Basically, low frequencies are more accentuated when the mic is close and more attenuated when the mic is further away. This is interesting if you want a warm voice (with lots of bass) for podcasting, or a clear voice (with little bass) for singing. So there is an “flat” distance for each mic where the voice is neither too warm nor too clear.
In general, these mics are held in place with a clamp like the one below.
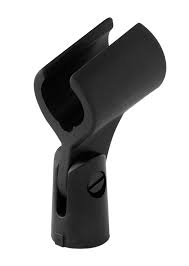
Dynamic mics often come with a clamp, but it’s worth checking to see if you can order one just in case. Even if vocal mics are meant to be hand-held, being able to place them on a stand or a mic arm (I’ll talk about this below) is more practical for capturing instruments or voice + instrument performances.
Condenser microphones
These microphones are more expensive than dynamic microphones, but they are also much more precise and sensitive. There are small and large diaphragm models. Like condenser microphones can be very compact and are used to capture the sound of acoustic instruments by being directly attached to them. Some models can be used to pick up drum sounds.
But in home studio, we will mainly be interested in large diaphragm models because they are widely used to capture the voice. They have a better rendering in the high frequencies, where dynamic microphones have more difficulty. They are also used to capture the sound of acoustic instruments such as pianos, acoustic guitars, etc…
On the other hand, the increased precision of large-diaphragm microphones makes them very sensitive to high volumes of sound that could damage them. Therefore, they should not be used with very loud musical instruments like drums or loud amps. There are condenser mics specifically for this purpose, but some condenser mics have a gain switch to lower the sensitivity by a few dozen decibels for use with loud sounds. In general, a condenser microphone will stand up to the volume of a human voice without a problem. However, it is better to move away from the microphone on the loudest notes to avoid saturating the signal. Otherwise it will create an unpleasant distortion in the sound and make the record unusable.
Their operation is quite similar to the dynamics microphone, except that the diaphragm is made of metal, thinner, freer to move, and has a small electric current flowing through it. It is therefore necessary to supply the microphone with what is called phantom power at 24 or 48v. This is a power supply which is passed through the cable or which is supplied by a battery which is inserted directly into the microphone. You should never drop a condenser microphone because they are very fragile. This would certainly mean their death…
Condenser microphones should not be held in the hand, otherwise you will hear all the rubbing and handling noises. It will be necessary to use an anti-shock system, which is called a spider in French.
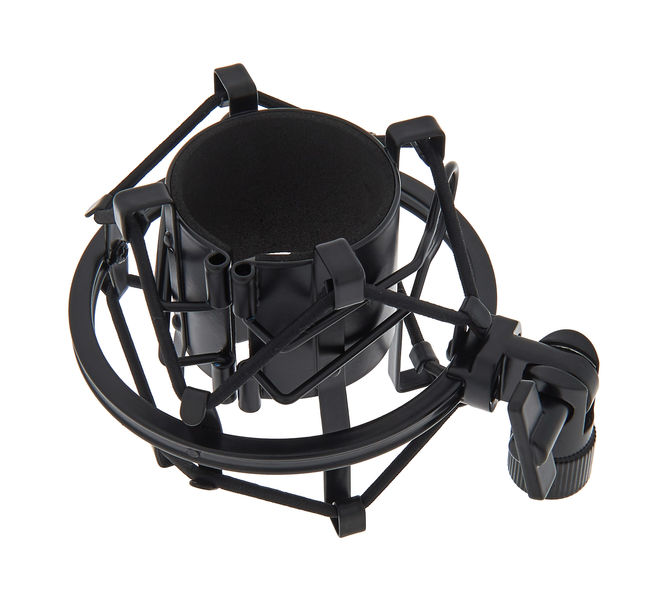
Ces systèmes sont souvent vendus avec les micros mais mieux vaut en être sûr pour en un commander un au cas où il n’y en aurait pas, sinon, vous ne pourrez pas utiliser le micro dans de bonnes conditions. De plus, comme ils n’ont pas de mousse, ils sont très sensibles au souffle. Il faudra donc utiliser un filtre anti-pop.
What is a pop filter?
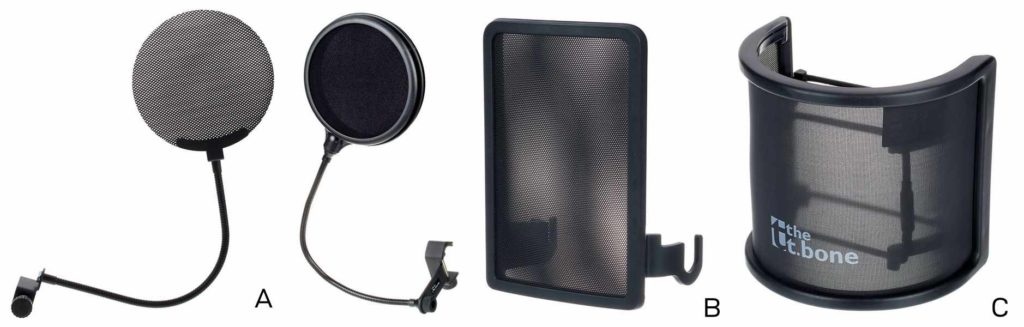
A pop filter plays the same role as the foam in dynamic microphones. It’s a cloth or a metal grid that you put between your mouth and the microphone to deflect the force of the voice’s breath and prevent it from hitting the microphone and ruining the take. In general, these filters protect well against plosives. That is, words with P, B or T that project a lot of breath when spoken.
The filter is either mounted on an articulated arm that can be attached to the microphone stand and placed exactly where you want it to be between you and the microphone (image A), or on a bracket that attaches directly to the anti-shock system (image B), or directly to the microphone (image C).
What about the windscreen?
Windscreens are foam caps that fit over the microphone to play the same role as the pop filter. They are especially useful outside when it’s windy. The downside is that these foams muffle the high frequencies a bit. They are therefore used in special cases such as podcasts to warm up the voice by limiting the high frequencies.

The foam models are perfect indoors or when there is little wind, to best capture someone’s voice on the fly. The furry model (called “Dead Cat”) is used in high winds. It will do a much better job than foam at diffusing the force of the wind. That’s why journalists use these two types of windscreens so much. They are also used mainly on dynamic microphones because, as you can imagine, when on location or reporting, it is easier to handle such a microphone than a large-diaphragm condenser microphone. Nevertheless, the “Dead Cat” models are often used in film and reports with directional microphones mounted on a shock mount at the end of a boom.
However, the use of such cups on a large-diaphragm microphone will not give great results, because the high frequencies will be muffled a bit. If you don’t have a choice, because you don’t have a pop filter, then these windscreens might be useful as a last resort, but it is better to use a pop filter that will keep the maximum of the voice.
The Polar Pattern
To explain without going into detail, directivity is the area around the microphone where sound is picked up. To put it simply, some microphones pick up sound only from the front and not from the back, while others pick up sound from all sides. There are five types: Cardioid, Supercardioid/Hypercardioid, Directional, Bidirectional (or “figure of 8”) and Omnidirectional.
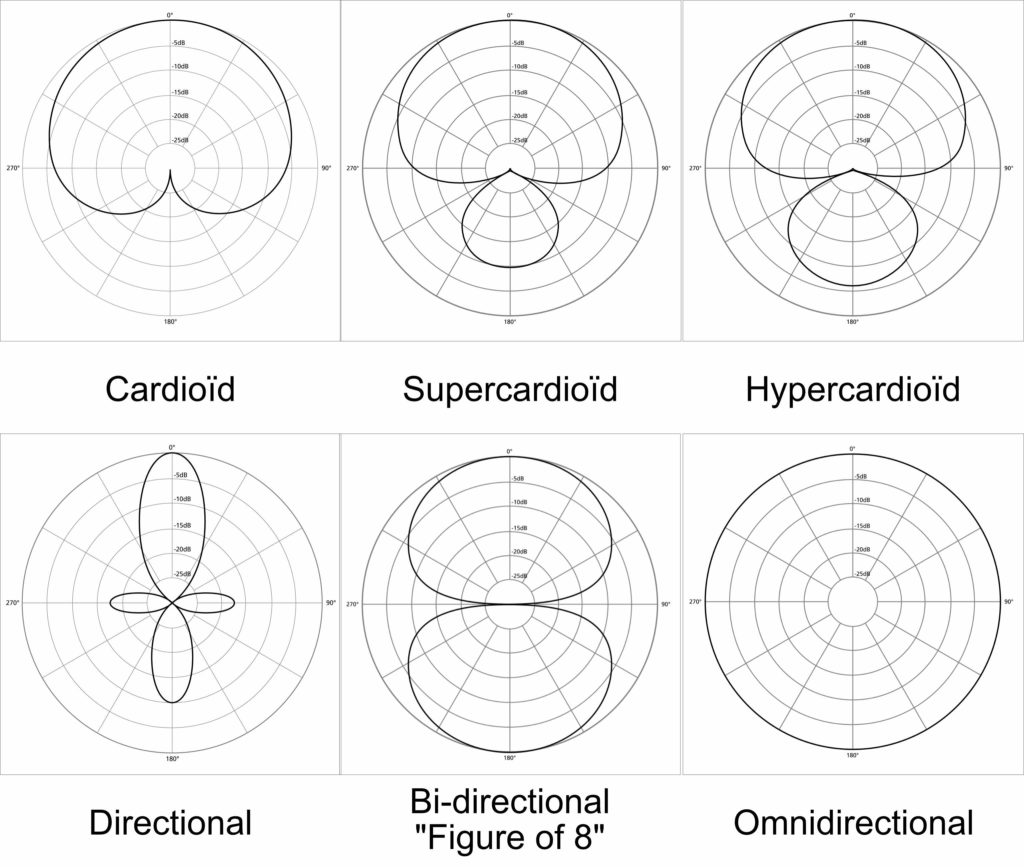
As you can see, the term cardioid is directly related to the heart-shaped representation of the polar pattern. Second, polar patterns have a very specific role.
A cardioid, supercardioid and hypercardioid microphone picks up sound mainly from the front, but also a little from the sides and very little from the back for super and hypercardioid. This is often the polar pattern of vocal microphones because it allows to pick up the voice towards the front while rejecting the sound of the returns which are placed in front of the performer; therefore, at the back of the microphone. This prevents feedback.
The directional microphone picks up sound only from the front. This directionality is specific to “shotgun” microphones because they are long tubes designed to pick up sound only in the direction of the microphone. These microphones are widely used in filming to pick up the voice of actors, but also with some models, in wildlife reporting, to pick up the sound of animals at a distance.
A bidirectional microphone will pick up sound to the front and back but not to the sides. This is often the case with large-diaphragm microphones that can pick up sound from either side, although there may be a switch on some models to switch to cardioid. This pattern can be interesting if you have two singers who will each be on one side of the microphone.
Finally, an omnidirectional microphone will pick up sound in all directions. This is the type of microphone used on a table during a meeting or to pick up sound from all directions.
Which polar pattern to choose?
In our case, i.e. the home studio, a cardioid or supercardioid pickup pattern is preferred. In any case, if you buy a dynamic vocal microphone, chances are that it will be cardioid or supercardioid. So, if you’re doing a sound recording, you’ll want to aim the mic with its back facing any source of noise like your computer fans. You will avoid picking up this noise with your voice.
If you want more accuracy and are using a large-diaphragm, bi-directional microphone, you will need to point the sides of the microphone towards the noise sources to avoid them being too present in the recording.
Of course, it is best to have an anechoic chamber.
What is an anechoic chamber?
This is a room that has been specially treated to eliminate any reverberation of sound off the walls. To explain in two words, the sound will leave the source, then bounce off the walls and return to the microphone to be recorded. This is the principle of echo and reverberation (or reverb). This is the big concern when recording an instrument or voice in an untreated room. This will create a rather unpleasant reverb on the sound that it will be almost impossible to remove on a computer without altering the recording.
To avoid this, we will put sound-absorbing materials on all the walls, to prevent the sound emitted by the source from bouncing off them.
There are some quite efficient phonic foams for this purpose, but we can also use standard foams, fabric, quilts, thick curtains, cushions, in short, any soft and granular material on which the sound will have difficulty to bounce.
For voice recordings, there are anechoic boxes like the one from Isovox where you just put your head to make your recording, minimizing the potential reverb since the voice is trapped in them.
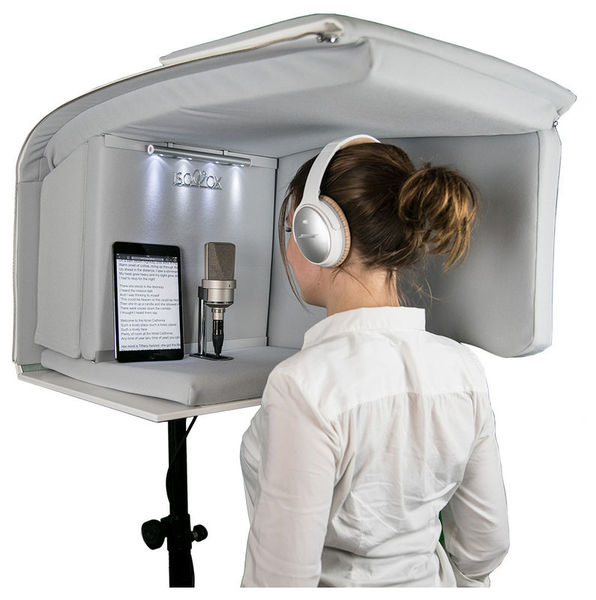
But then, the Isovox is quite expensive. There is a way to make one yourself with a cardboard box that you will line with absorbent foam but the problem is that you will not be able to record instruments with this type of box; except maybe the flute, the Jew’s harp and the harmonica 🙂
But what if I don’t have an anechoic chamber?
There are techniques to do without an anechoic room, but be aware that you will never have a professional sound or you will have to process the sound with plugins to try to improve it a little. But I can give you a few tips to improve your sound recording.
First, you can move the microphone away from any noise source by using a long cable or even place the microphone in a quieter room than your studio.
Second, you can take advantage of the directionality of your microphone by placing it strategically in your home studio. As mentioned above, by pointing the back of a cardioid microphone at noise sources, you will limit the amount of noise picked up by the capsule. The same is true if you point the sides of a two-way microphone at the noise sources.
In the case of a two-way microphone, you can also limit the sound coming from the back of the microphone by moving it closer to a wall on which you have placed an absorbent material such as foam, thick curtains, a cushion, a standing mattress or even an open closet full of clothes.
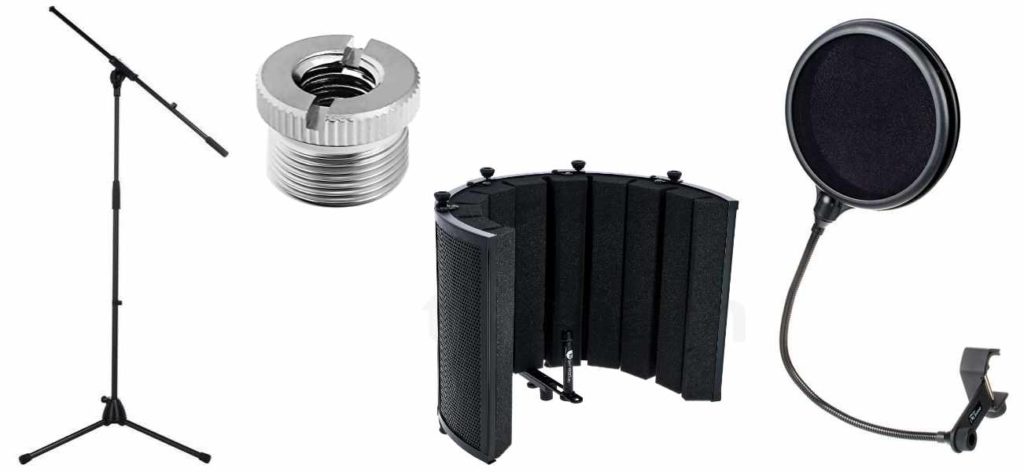
You can also use a sound barrier to limit the sound coming from behind.
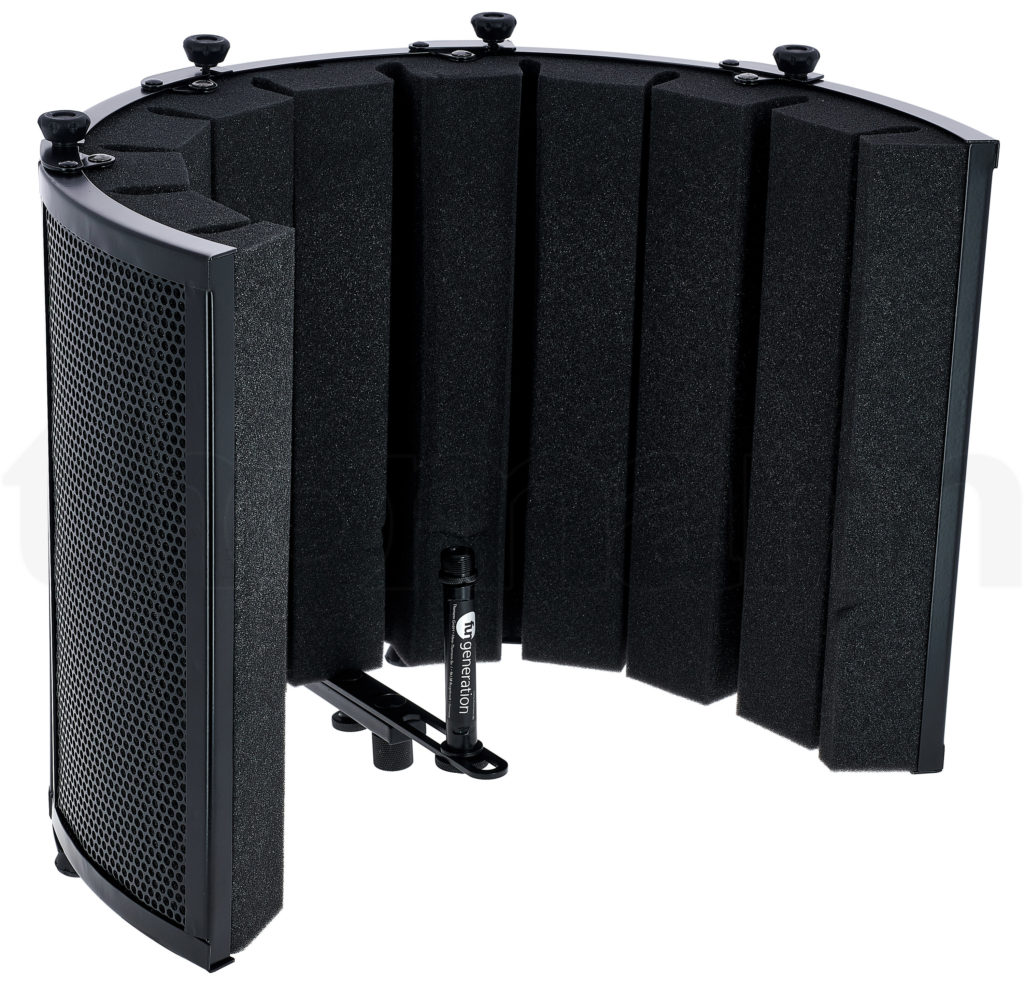
This type of screen is interesting because it allows you to place the microphone wherever you want in your studio. But more importantly, you can place it so that the performer’s back is to a wall covered with an absorbent material. This limits the sound coming from behind and in front of the microphone. This could greatly help in your sound recording. However, these screens won’t stop your voice from bouncing off the walls around and coming back to the mic. It just isolates the microphone from the surrounding noise as best as possible.
There are smaller models that you can use for podcasting, if you want to limit the noise from your computer a little bit by putting that screen behind your microphone. But a cardioid pattern should also help in this case.
You can use foam squares that you place on bare walls to limit the surface on which the sound can bounce.
But you can also use a room cluttered with clothes, linens, cardboard boxes or a closet full of clutter to make your recording. Clutter diffuses more and can limit the reverberation of sound a bit.
A good way to tell if a small room is a good place to record is to clap your hands. If you hear nothing more than the clapping of your hands, you’re good to go. If you hear a slightly metallic sound that quickly follows the clapping, there is reverb in the room. You can try to make your recording there, but avoid sounds that are too loud, which will amplify the reverb. On the other hand, if you hear an echo or a “church” reverb when you clap your hands, either look for another location or include that reverb in your track.
Which cable to connect the microphone to?
Microphones are usually connected to the audio interface with an XLR cable (read my post about the USB audio interfaces). This is the connection that offers the best sound quality. There are also USB mics that are perfect for podcasting and YouTube videos. You can use them to record vocals or instruments but you need a computer to use it whereas the XLR connection can be used with most portable or non portable recorders. There are also microphones with a 6.5mm jack cable attached. In general, this kind of mics is more used for home karaoke. They can give good results but the jack is less interesting than the XLR for signal transport.
Mic stands?
To use a dynamic or condenser microphone, you will need a mic stand. It will be much more comfortable to use in the studio if the microphones are on a stand. There are two types. The simple, concert-style stands, where the mic sits on top of the stand for standing performances, and the stands with an arm that are more convenient to point at a seated singer or instrument.
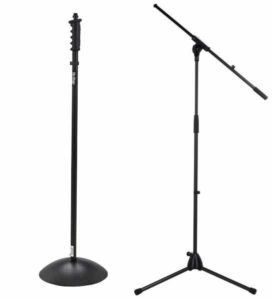
If you can only take one, I recommend you to take the model with arm which will be more versatile. I also advise you to have at least two microphone stands and two microphones, if you want to record performances with instruments like guitar+vocals.
What about articulated arms?
This is another type of microphone stand that allows you to use it while standing in front of your computer. It comes attached to your desk and allows you to fold it in a corner when you are not using it and bring it back in front of you when the time comes.
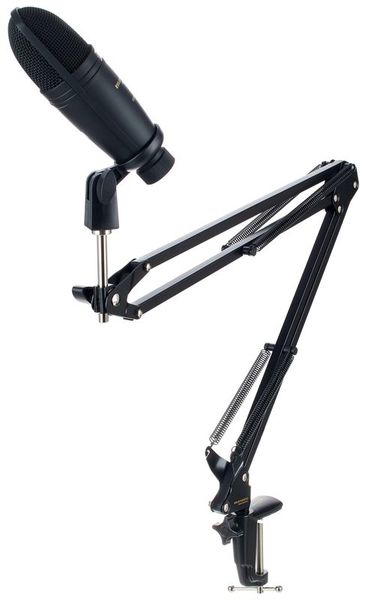
They are used a lot in radio and podcasting. In music creation, they can also be useful, if you want to have a microphone available to record ideas or sounds for sound design.
As you can see, the microphone stands and arms allow you to attach your clamps or shockmounts of your microphones, but there are two different screw threads to attach these elements. Most of the time an adapter (like the one below) is provided with the mic, the clamp or the stand.
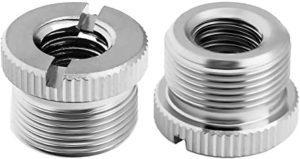
But if not, buy one just in case. It would be silly not to be able to attach your microphone to your stand because of a screw…
I give you links to buy all this in the listing below !
Now that you know what you need to know about microphones, here is my selection:
(Prices listed were found at the time of writing this article in May 2021.
They may have changed on the sellers’ site by the time you read this article).
Dynamic Microphones
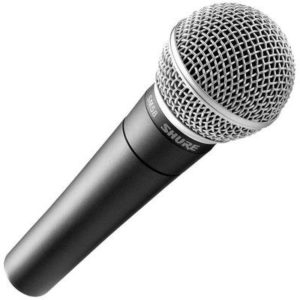
Shure is a well-known brand in the world of microphones and studio headphones. Its SM58 is legendary for its sound quality and durability. It provides a warm sound. Its grille, although durable, is somewhat flexible to ensure good shock absorption and can be removed by pushing it from the inside. This is a microphone you can rely on. It is very popular for singers and producers. If you choose this mic, it will last you many years.
It comes in both switchable and non-switchable versions.
Features :
– Connector: XLR
– Frequency response: 50 Hz – 15 kHz
– Transducer type: Dynamic
– Directionality: Cardioid
– Metal body
– Weight: 298 g
SM58 :
Thomann : 98 €
Amazon.fr : 98 €
SM58S (with switch):
Thomann : 105 €
Amazon.fr : 105 €
Images : (click on the images to zoom in)
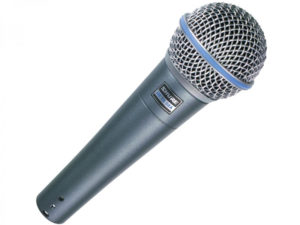
The Beta 58A is part of the SM58 family without being identical. In terms of differences, it is clearer than the SM58, perfect for low voices, but it is also much more directional. This means that the sound source must be well in front of the microphone for the volume to be optimal. The grille is harder but the shock absorption system is improved compared to the SM58.
Features:
– Connector: Gold-plated XLR
– Frequency response: 50 Hz – 16 kHz
– Driver type: Dynamic
– Directionality: Supercardioid
– Capsule with anti-shock suspension system
– Metal body
– Weight: 278 g
Beta 58A :
Thomann : 148 €
Amazon.fr : 148 €
Images : (click on the images to zoom in)
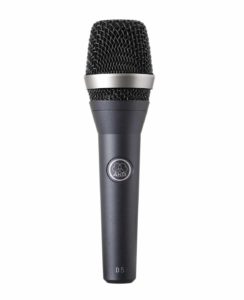
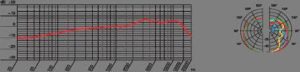
AKG is a major manufacturer in the world of sound and music. Their microphones are high-quality while being a bit cheaper than the entry-level Shure. In terms of sound, this D5 is very close to the SM58. Its body is also made of metal which gives confidence in its robustness
Features :
– Connector: XLR
– Frequency response: 70 Hz – 20 kHz
– Transducer type: Dynamic
– Directionality: Supercardioid
– Capsule with anti-shock suspension system
– Metal body
– Weight: 340 g
D5 :
Thomann : 59 €
Amazon.fr : 59 €
D5S (avec interrupteur) :
Thomann : 75 €
Amazon.fr : 111 €
Images : (click on the images to zoom in)
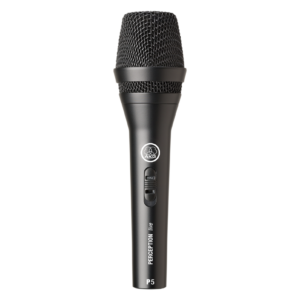
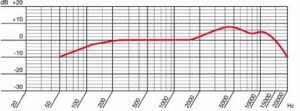
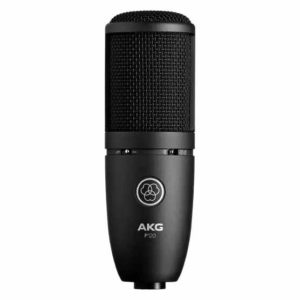
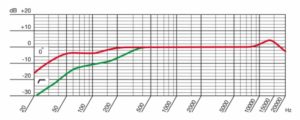
The P5 from AKG is a microphone designed specifically for voice. Its directionality allows to reject the maximum of sound coming from the sides and from the back.
Features:
– Connector: XLR
– with On/Off switch
– Frequency response: 40 Hz – 20 kHz
– Driver type: Dynamic
– Directionality: Supercardioid
– Metal body
– Weight: 320 g
P5S :
Thomann : 36 €
Amazon.fr : 36 €
Images : (click on the images to zoom in)
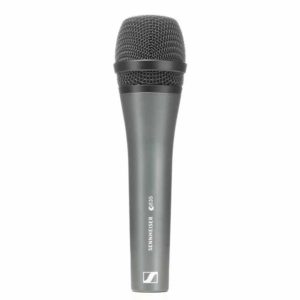
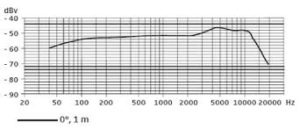
Sennheiser is a well-known brand in the microphone market. They have a whole range of wireless microphones used in many concerts or TV shows. The E835 is their entry level microphone perfect for singing or podcasting.
Features:
– Connector: XLR
– Frequency response: 40 Hz – 16 kHz
– Transducer type: Dynamic
– Directionality: Cardioid
– Plastic body
– Capsule with anti-shock suspension system
– Weight: 330 g
E835 :
Thomann : 79 €
Amazon.fr : 83 €
Amazon.fr (Bundle) : 104 €
E835S (with switch) :
Thomann : 79 €
Images : (click on the images to zoom in)
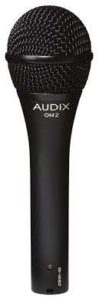
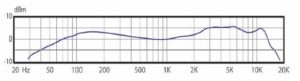
Audix is a fairly well known brand in the world of live performance and microphones for instruments like drums. The brand has several vocal microphones intended for the stage in its OM range (from the OM2 to the OM11 with increasing price and performance). These are also hypercardioid microphones. This means that they pick up sound only towards the front of the microphone. This allows an excellent rejection of sounds coming from the sides or from the back. I chose to present you the OM2 because it is the most famous and the least expensive of this range but you can quite find your happiness in the OM range. One thing to take into consideration is that the output of the microphone is quite low, you will probably have to turn up the gain a little on the recorder or in your DAW.
Characteristics :
– Connector: XLR
– Frequency response: 50 Hz – 16 kHz
– Type of transducer: Dynamic
– Directionality: Hypercardioid
– Metal body
– Weight: 307 g
OM2 :
Thomann : 91 €
OM2S (with switch) :
Thomann : 109 €
Images : (click on the images to zoom in)
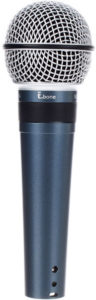
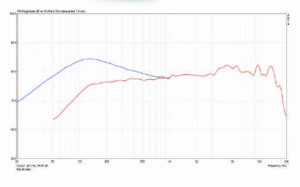
T.Bone is the brand of the German retailer Thomann. In general, this brand makes good equipment for a more than contained price. This M85 Beta, which is the worthy successor of the M85, is a very good entry-level microphone perfect for singing or podcasting.
Features :
– Connector: XLR
– Frequency response: 20 Hz – 17 kHz
– Transducer type: Dynamic
– Directionality: Supercardioid
– Plastic body
– Weight: 256 g
M85 Beta :
Thomann : 39 €
Images : (click on the images to zoom in)
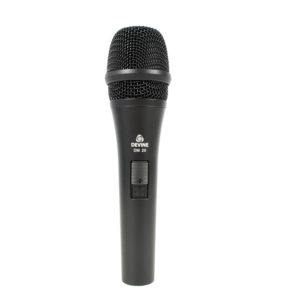
Devine is a small brand making mostly entry-level equipment. Nevertheless, this DM20 is very well made with a metal body and a suspended capsule at a very low price. It will be perfectly suitable for small budgets.
Characteristics :
– Connector: XLR
– Frequency response: 16 Hz – 16.9 kHz
– Type of transducer: Dynamic
– Directionality: Cardioid
– Capsule with anti-shock suspension system
– Metal body
– Weight: 300 g
Devine DM20 :
Bax-Shop : 40 €
Images : (click on the images to zoom in)
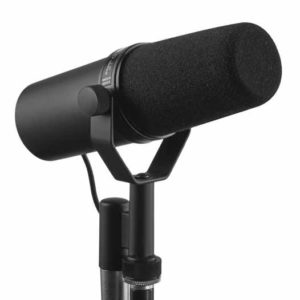
I put this microphone on, even though it is very expensive, because it is very famous among podcasters but also among producers. The Shure SM 7 B offers excellent sound quality with very good gain and frequency management. The microphone has a rather warm sound with low-brightness high frequencies. This makes it perfect for speaking voices. For singing voices, where more high frequencies are needed, the top end of the spectrum may need to be raised. The mic has an internal shock mount and several switches on the back for sculpting the output sound.
One small downside is that the output gain of the mic is quite low, so it’s best to use it with a preamp which will raise the bill by about €60/90.
Characteristics :
– Connector: XLR
– Frequency response: 50 Hz – 20 kHz
– Type of transducer: Dynamic
– Directionality: Cardioid
– Metal body
– Weight: 700 g
SM 7 B :
Thomann : 379 €
Amazon.fr : 377 €
Preamps :
Triton Audio FetHead : Thomann : 77 € | Amazon.fr : 85 €
Thomann FetAmp : Thomann : 59 €
Images : (click on the images to zoom in)
Microphones à condensateur large membrane
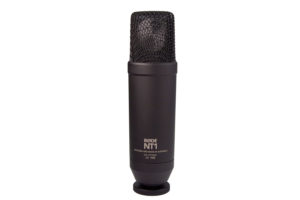
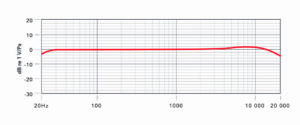
Rode made a name for itself in the world of YouTube video with its directional microphones to be attached to the first cameras capable of filming. Nevertheless, the brand has developed dozens of microphone models, including this NT1, which is very popular among podcasters. It is still capable of giving good results in recording vocals. There is a more recent model, the NT1-A, but the NT1 still has a long way to go. There is also a USB version of this mic that can be handy on the go with just your laptop and mic.
Features :
– Connector: XLR
– Frequency response: 20 Hz – 20 kHz
– Transducer type: Large diaphragm condenser
– Directivity: Cardioid
– Metal body
– Weight: 395 g
NT1 :
Thomann (Bundle) : 259 €
Thomann (USB) : 155 €
Amazon.fr (Bundle) : 195 €
Amazon.fr (USB) : 195 €
NT1-A :
Thomann (Bundle) : 159 €
Amazon.fr (Bundle) : 196 €
Images : (click on the images to zoom in)
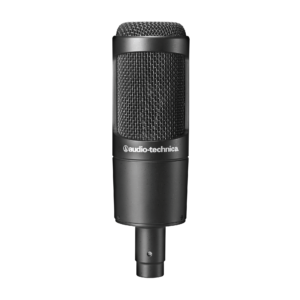
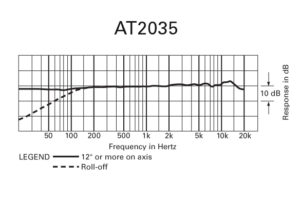
Audio-Technica is best known for its studio headphones, but they don’t fall short when it comes to their microphones. The AT2035 is the successor of the excellent AT2020. It is good for both speaking and singing. It has a bit more high frequencies than its predecessor and also a better handling of the dynamics. This microphone also has a particularity, it is that it is delivered with a support which is fixed underneath it to put it on a stand. It’s an interesting idea, but if you opt for this mic, I’d advise you to get a shock mount just in case.
Characteristics :
– Connector: XLR
– Frequency response: 20 Hz – 20 kHz
– Transducer type: Large diaphragm condenser
– Directionality: Cardioid
– Switchable low cut filter
– PAD switch -10 dB
– Metal body
– Weight: 395 g
AT2035 :
Thomann (Bundle) : 155 €
Amazon.fr (USB) : 155 €
Images : (click on the images to zoom in)
The P120 is an excellent vocal microphone. In addition to its sound quality, it has a switchable low-cut filter that cuts low frequencies below 120 Hz and a switch to lower the gain by 20 dB for loud sounds. The sound quality is excellent for singing. You can’t go wrong choosing it.
Features:
– Connector: XLR
– Frequency response: 20 Hz – 20 kHz
– Transducer type: Large diaphragm condenser
– Directionality: Cardioid
– Switchable low cut filter: 120 Hz
– Gain switch (PAD) -20 dB
– Metal body
– Weight: 395 g
P120 :
Thomann : 85 €
Amazon.fr : 85 €
Images : (click on the images to zoom in)
The P240 is the big brother of the P120 and has the advantage of a selectable directional pattern between cardioid, bi-directional and omnidirectional to suit your recording conditions. It also has a switchable low-cut filter that cuts low frequencies below 300 Hz and a -20 dB gain switch. Very interesting!
Features:
– Connector: XLR
– Frequency response: 20 Hz – 20 kHz
– Driver type: Large diaphragm condenser
– Directionality: Cardioid, bidirectional and omnidirectional
– Switchable low cut filter: 300 Hz
– Gain switch (PAD) -20 dB
– Metal body
– Weight: 525 g
P420 :
Thomann : 185 €
Amazon.fr : 185 €
Images : (click on the images to zoom in)
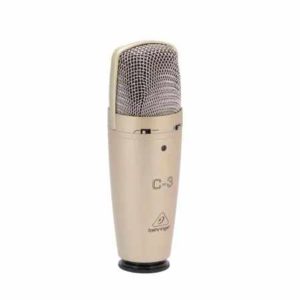
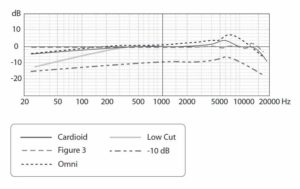
Behringer is a pretty well known brand in music. They make a lot of well-made entry-level equipment. This C-3 is a very interesting voice microphone because despite its low price, it is equipped with a switch that allows it to change directionality from cardioid to omnidirectional and even bi-directional. This is really very practical. As for the Audio-Technica, the C-3 is delivered with a support which is fixed underneath it to put it on a stand but without anti-shock system. It’s an interesting idea but, if you opt for this mic, I’d advise you to get an anti-shock mount anyway just in case.
Characteristics :
– Connector: XLR
– Frequency response: 40 Hz – 18 kHz
– Transducer type: Large diaphragm condenser
– Directionality: Cardioid, bidirectional and omnidirectional
– Switchable low cut filter: 300 Hz
– Gain switch (PAD) -10 dB
– Metal body
– Weight: 400 g
C-3 :
Thomann (Bundle) : 44 €
Amazon.fr (USB) : 37 €
Images : (click on the images to zoom in)
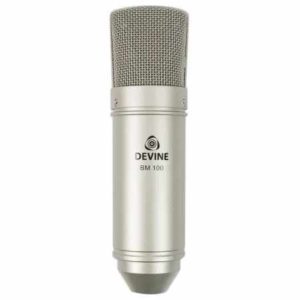
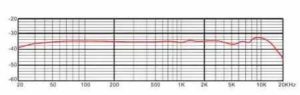
The BM100 from Devine is a microphone that doesn’t look like much but is very interesting for someone who doesn’t have much money. It will allow you to record your voice as well as your instruments at a very low cost. Personally, I use it as a backup mic to record my ideas in my DAW.The high frequencies are slightly attenuated, which makes it very interesting for podcasting.
Features :
– Connector: XLR
– Frequency response: 20 Hz – 20.9 kHz
– Transducer type: Large diaphragm condenser
– Directionality: Cardioid
– Metal body
– Weight: 300 g
BM100 :
Bax-Shop : 34 €
Images : (click on the images to zoom in)
– If you don’t have a lot of money, I’d recommend the Devine, Behringer C-3 or T.Bone MB85.
– If you have in the 100 € range, I recommend the Shure SM58, the AKG, the Audix and the Sennheiser which will do a good job.
– If you want to record studio vocals or acoustic instruments, then go for a large-diaphragm mic.
– If you want to record electric guitar amps or high volume instruments, then go for a dynamic mic instead.
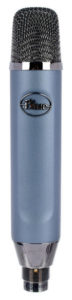
– If you want to do podcasting, go for a mic around the €100-150 range like the SM58, AKG D5, P120, Rode Nt-1, Blue Ember, or if you can afford it the Shure SM 7B which was designed for podcasting.
There are still a lot of models you could test but the ones from the selection above are good values. Then, if you can really afford it, you can go for much more expensive mics from brands like Shure, Sennheiser or Neumann. Above 1000 €, most microphones of this price are of very good quality. You can’t go wrong. Just keep in mind that the choice of a microphone is also a matter of taste for its sound.
I hope this guide will be helpful in your choice. Leave me a message in the comments if you know of any other studio headsets, have any comments or have any questions or topics you’d like me to cover.


Be the first to comment